최근에 챗봇에 관심 생길만한 일이 있어서 공부할 겸 처음으로 keras 사용,, pytorch보다 훨씬 편한 건 기분 탓일까
코드 및 출처는 HERE
Library version (문서 기준)
tensorflow==2.3.1
nltk==3.5
colorama==0.4.3
numpy==1.18.5
scikit_learn==0.23.2
Flask==1.1.2
참고로 나는 colab을 사용했고 약간의 버전 차이는 있지만 별 차이 없는 것 같고
colorama만 없어서 중간에 install 해주었다.
!pip install colorama일단 json 파일에 모델 학습을 위한 데이터가 저장되어 있었다.
✔️ tag : y
✔️ patterns : x

형태는 위와 같이 되어 있다.
이 딕셔너리 데이터를 풀어주기에 앞서 모듈 임포트를 진행해야 한다.
1. Module import
import json # json 데이터를 사용하기 위함
import numpy as np
import tensorflow as tf
from tensorflow import keras
from tensorflow.keras.models import Sequential # 모델 선언을 위해 필요한 모듈들
from tensorflow.keras.layers import Dense, Embedding, GlobalAveragePooling1D
from tensorflow.keras.preprocessing.text import Tokenizer # 단어를 토큰화하기 위한 모듈
from tensorflow.keras.preprocessing.sequence import pad_sequences
from sklearn.preprocessing import LabelEncoder # object -> 수치형으로
위와 같이 필요한 모듈을 임포트 해준다.
2. json파일 ➡️ train데이터로 만들기
with open('intents.json') as file:
    data = json.load(file)

training_sentences = []
training_labels = []
labels = []
responses = []


for intent in data['intents']:
    for pattern in intent['patterns']:
        training_sentences.append(pattern)
        training_labels.append(intent['tag'])
    responses.append(intent['responses'])

    if intent['tag'] not in labels:
        labels.append(intent['tag'])

num_classes = len(labels)json.load()을 사용하여 json 안에 있는 딕셔너리를 가져올 수 있다.
[ Data example ]
"tag": "greeting",
"patterns": ["Hi", "Hey", "Is anyone there?", "Hello", "Hay"],
"responses": ["Hello", "Hi", "Hi there"]
- training_sentences : json에 있는 patterns에 해당 ex ) Hi

- training_labels : 해당하는 patterns의 tag 저장 ex ) gretting

- labels : 클래스가 몇 개 있는지 확인하기 위한 tag들 저장 ex ) gretting

- responses : tag에 해당하는 responses 다 저장 ex) ["Hello", "Hi", "Hi there"]

training_labels와 labels의 차이는 일단 labels는 중복이 없고 클래스의 종류를 나타내지만
training_labels는 이름 그대로 training_sentences당 한 개씩 존재한다 y - x의 관계기 때문에
따라서 결과를 보면 아래의 사진들처럼 나온다.

3. label 데이터 수치형으로 인코딩
학습이 가능하도록 y 데이터를 수치형으로 지정해주기 위해 label_encoder()을 사용해서 training_labels를 수치형(숫자)으로 바꿔준다.
# ver 1
lbl_encoder = LabelEncoder()
lbl_encoder.fit(training_labels)
training_labels = lbl_encoder.transform(training_labels)

# ver 2
lbl_encoder = LabelEncoder()
training_labels = lbl_encoder.fit_transform(training_labels)
두 버전의 결과의 차이는 없다.
개인적으로는 두 번 쓰는 것이 귀찮아서 한꺼번에 하는 fit_transform을 좀 더 사용하는 편
4. training_sentences 토크나이저
[ FULL CODE ]
vocab_size = 1000 #단어의 크기

embedding_dim = 8 # 임베딩 후의 벡터의 크기

max_len = 20 # 입력 시퀀스의 길이

oov_token = "<OOV>"


tokenizer = Tokenizer(num_words=vocab_size, oov_token=oov_token) # 빈도수를 기준으로 토큰화하기 위해 토크나이저 설정

tokenizer.fit_on_texts(training_sentences) # training_sentences 토그나이저 실행

word_index = tokenizer.word_index # 해당하는 단어의 index 알려줌

print(word_index)

sequences = tokenizer.texts_to_sequences(training_sentences) # 문장의 index 번호 설정

print(sequences)

padded_sequences = pad_sequences(sequences, truncating='post', maxlen=max_len) # 포스트 시퀀스 패딩 끝부분을 0으로 채움

print(padded_sequences)
vocab_size = 1000 #단어의 크기
embedding_dim = 16 # 임베딩 후의 벡터의 크기
max_len = 20 # 입력 시퀀스의 길이
oov_token = "<OOV>"단어의 크기가 저렇게까지 많지 않은데 왜 100이나 해놓은지는 모르겠다 결과를 보니 training_sentences에 존재하는 단어는 52개이다.
아무튼 임베딩 벡터로 만들어줄 때 임베딩 후의 벡터의 크기를 16으로 정해놨다.
💡 임베딩이란 ?
단어를 밀집 벡터로 만드는 작업을 워드 임베딩(word embedding)이라고 하고,
밀집 벡터는 워드 임베딩 과정을 통해 나온 결과로 임베딩 벡터(embedding vector)라고 한다.
밀집 벡터는 원핫 인코딩과 다르게 저 차원이며 실수형으로 되어있다.
입력 시퀀스의 길이(max_len)가 20으로 되어 있는데 패딩 시퀀스를 해 본 결과 10 정도로 수정해도 될 것 같다.
oov_token는 미리 토큰화 되어 있지 않은 단어(단어 집합에 없는 단어)를 <OOV>로 지정하고 인덱스를 1로 지정하는 것이다
tokenizer = Tokenizer(num_words=vocab_size, oov_token=oov_token) # 빈도수를 기준으로 토큰화하기 위해 토크나이저 선언
토크나이저 선언 단어의 개수(vocab_size)는 위에서 지정했던 1000개로, 토큰화하지 못한 단어는 oov로 설정하지만 이 데이터에서 단어의 개수보다 vocab_size가 매우 크기 때문에 oov로 지정된 데이터는 없는 것을 확인할 수 있다.
tokenizer.fit_on_texts(training_sentences) # training_sentences 토그나이저 실행토크나이저를 사용해 training_sentences의 문장을 단어 단위로 쪼개 준다.
word_index = tokenizer.word_index # 해당하는 단어의 index 알려줌
print(word_index)
tokenizer.word_index : training_sentences의 문장을 단어 단위로 쪼갠 단어들의 index를 확인할 수 있다.

sequences = tokenizer.texts_to_sequences(training_sentences) # 문장의 index 번호 설정
print(sequences)tokenizer.texts_to_sequences(x_train): 토큰화한 결과를 문장에 적용한 결과를 반환한다.
예를 들면 hi의 index가 29면 hi가 있는 곳에 29를 넣는 것이다.

padded_sequences = pad_sequences(sequences, truncating='post', maxlen=max_len) # 포스트 시퀀스 패딩 끝부분을 0으로 채움
print(padded_sequences)
학습을 시키기 위해서는 모든 문장의 길이가 동일해야 하기 때문에 pad_sequences를 사용해 길이를 맞춰준다.
해당 코드에서는 20으로 지정해주었지만 최대 길이가 7이기 때문에 10 정도로 지정해주어도 될 것 같다.
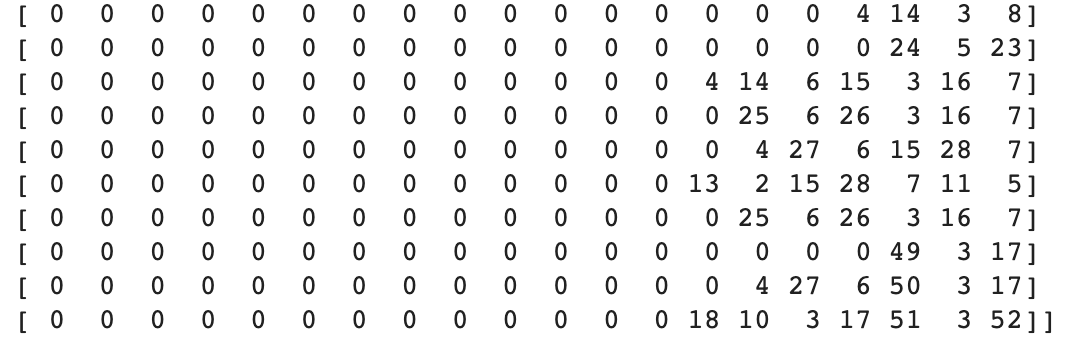
📌 max_len보다 시퀀스의 길이가 길면 시퀀스를 max_len 크기가 되도록 잘라낸다.
5. Model 만들기
# Model Training

model = Sequential() # 층 구성을 위한 모델 선언 - (1)
model.add(Embedding(vocab_size, embedding_dim, input_length=max_len)) # 임베딩 층 - (2)
model.add(GlobalAveragePooling1D()) # (3)
model.add(Dense(16, activation='relu')) # - (4)
model.add(Dense(16, activation='relu')) # - (5)
model.add(Dense(num_classes, activation='softmax')) # 8개의 종류로 되어 있으니까 마지막 층은 8 - (6)
(1) 은 모델을 만들기 위해 선언
(2) 임베딩 벡터로 만들어 주기 위한 임베딩 층
(3) 왜 쓰는 건지 알려줄,, 사람이 필요,,,,
(4), (5) 은닉층
(6) - 출력층
- 은닉층에 주로 사용되는 활성화 함수는 relu
- 다중 분류 출력층에서 주로 사용되는 활성화 함수는 softmax
- 이진 분류 출력층에서 주로 사용되는 활성화 함수는 sigmoid
model.compile(loss='sparse_categorical_crossentropy',
              optimizer='adam', metrics=['accuracy'])
# 모델을 기계가 이해할 수 있도록 컴파일
# Loss 함수, optimizer 함수, 훈련을 모니터링하기 위한 지표선택로 되어 있음

model.summary() # 모델의 구조를 요약해 출력해줍니다.
다중 분류의 Loss 함수로는
categorical_crossentropy, sparse_categorical_crossentropy를 사용할 수 있음
optimizer 함수로는
adam, rmsprop, sgd 등등을 사용할 수 있음model.summary() : 모델의 구조를 요약해서 아래와 같이 출력해준다.

6. model 학습
epochs = 500
history = model.fit(padded_sequences, np.array(training_labels), epochs=epochs) # train_X, train_y, epoch 순
train 데이터로 학습
밑에 코드로는 모델을 .pickle 형태로 저장해서 실제로 입력받은 문자에 대한 답을 하는 것 코드인데 pickle에 대한 이해가 없어서 이건 조금 더 공부해야 할 듯
# to save the trained model
model.save("chat_model")

import pickle

# to save the fitted tokenizer
with open('tokenizer.pickle', 'wb') as handle:
    pickle.dump(tokenizer, handle, protocol=pickle.HIGHEST_PROTOCOL)

# to save the fitted label encoder
with open('label_encoder.pickle', 'wb') as ecn_file:
    pickle.dump(lbl_encoder, ecn_file, protocol=pickle.HIGHEST_PROTOCOL)


import json
import numpy as np
from tensorflow import keras
from sklearn.preprocessing import LabelEncoder

import colorama
colorama.init()
from colorama import Fore, Style, Back

import random
import pickle

with open("intents.json") as file:
    data = json.load(file)


def chat():
    # load trained model
    model = keras.models.load_model('chat_model')

    # load tokenizer object
    with open('tokenizer.pickle', 'rb') as handle:
        tokenizer = pickle.load(handle)

    # load label encoder object
    with open('label_encoder.pickle', 'rb') as enc:
        lbl_encoder = pickle.load(enc)

    # parameters
    max_len = 20

    while True:
        print(Fore.LIGHTBLUE_EX + "User: " + Style.RESET_ALL, end="")
        inp = input()
        if inp.lower() == "quit":
            break

        result = model.predict(keras.preprocessing.sequence.pad_sequences(tokenizer.texts_to_sequences([inp]),
                                             truncating='post', maxlen=max_len))
        tag = lbl_encoder.inverse_transform([np.argmax(result)])

        for i in data['intents']:
            if i['tag'] == tag:
                print(Fore.GREEN + "ChatBot:" + Style.RESET_ALL , np.random.choice(i['responses']))

        # print(Fore.GREEN + "ChatBot:" + Style.RESET_ALL,random.choice(responses))

print(Fore.YELLOW + "Start messaging with the bot (type quit to stop)!" + Style.RESET_ALL)
chat()'CODING > AI & ML & DL' 카테고리의 다른 글
| [Python/sklearn] Scaler 별 특징 / 사용법 / 차이 / 예시 (0) | 2021.10.07 |
|---|---|
| [Python/데이터분석] 상관계수 해석 (0) | 2021.09.05 |
| [ML] BoVW : bag of visual words | Feature engineering (1) | 2020.12.22 |
| [기계학습] 의사결정나무 | Decision Tree (0) | 2020.10.30 |
| [기계학습] 이차 판별 분석 | Quadratic Discriminat Analysis (0) | 2020.10.15 |


댓글